


 I already pointed out the advantages of a build in decoder for switches at another page.
Unfortunatly the M-track decoder for switches does not fit into the new C-Track.
Therefore Mario Binder and I developped a decoder for C-track switches, including a fitting printed circuit, based
on the diagram of the decoder for M-track. I will present both to you in the next section. An corresponding article incl. layouts pp. is published in MIBA 4/99.
I already pointed out the advantages of a build in decoder for switches at another page.
Unfortunatly the M-track decoder for switches does not fit into the new C-Track.
Therefore Mario Binder and I developped a decoder for C-track switches, including a fitting printed circuit, based
on the diagram of the decoder for M-track. I will present both to you in the next section. An corresponding article incl. layouts pp. is published in MIBA 4/99.
Independedly from this Bo Braendstrup developped a decoder of his own.
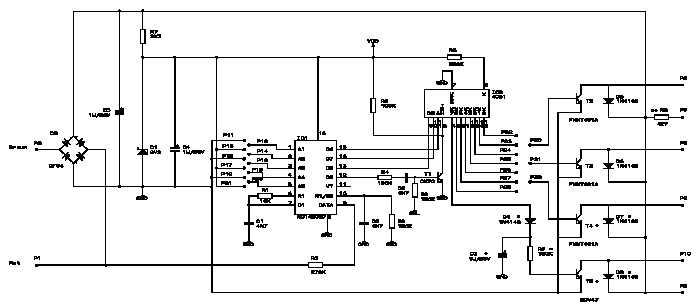
As you can see from the circuit above all 8 subadresses are decoded by one C-MOS 4051.
The circuit is well-known; some detailes however will be explained in more detail.
The circuit has the advantage, as apposed to eg. Märklins decoder,
that one circuit can control more than one switch by adding some extra wires and some
transistors and diodes. This is however only an advantage when the switches are
positioned next to eachother.
As a consequence of this the address choices will be made by means of soldering bridges or small wires, eg. wire-wrap wires.
To be able to use a small capacitor for flattening the DC current and to draw current from both the positive and negative side of the digital signal we use
a full rectifier, the same way that is used in the decoders for engines.
For reasons of space the transistors for switching the coils of the switches are
of a special type, made by ZETEX. Although these are not of a Darlington-type
they are the smallest common type SOT-23 and they can still withstand a
curent of 1 A and have a relatively high amplification so the current draw of the
decoder will remain small. But purpose is also to make shure that a malfunction of the turnout or controller does not destroy the expensive turnout-drive but the much more cheap transistors. Because of the now known problems of the turnout-drives we have added R8 which shall makes shure a reliable switching of the turnout and acts as an additional fuse.
Da die FMMT491A aber besonders in kleinen Stückzahlen nur schwer zu beschaffen sind, gibt es eine ansonsten schaltungsidentische Variante mit den SOT89-Typen BCX56. Außerdem können auch einige SOT23-FETs eingesetzt werden. Dies ist zunächst der NDS351N bzw. NDS351AN von Fairchild, der bei max. 0,2 Ohm Widerstand über 1 A schalten kann. Leider ist er etwas teuer. Alternativ können die BSH105 bzw. BS102 von Philips verwendet werden. Der BSH105 kann ebenfalls über 1 A bei ca. 0,2 Ohm schalten, wäre also auch sehr gut geeignet. Leider reicht seine Spannungsfestigkeit von 20 V nur für den Einsatz mit stabilisierten Boostern (typischerweise +/- 18V) aus. Der BSH102 ist bis 30V geeignet, kann aber nur max. 0,85A bei ca. 0,4 Ohm schalten. In der Praxis hat er auch seine Tauglichkeit unter Beweis gestellt. Alle diese FETs sind z.B. bei Farnell erhältlich.
Of course the circuit is build with SMD-components, otherwise the decoder would
become to large to fit in the switch.
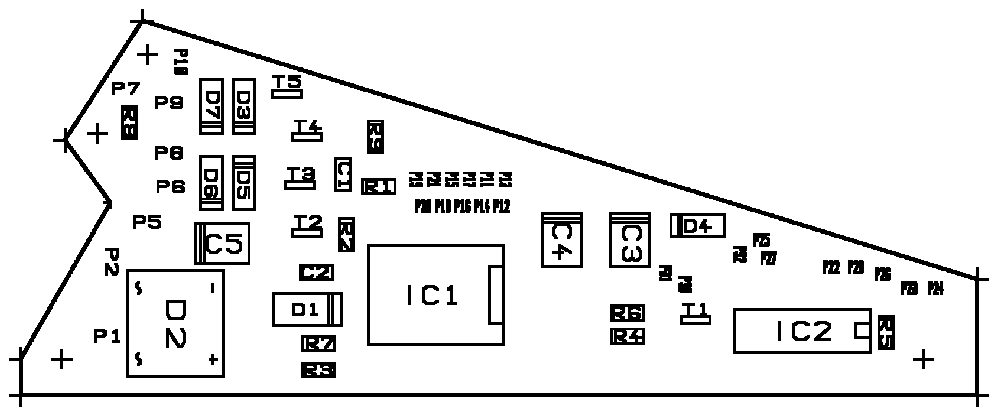
Here we have the parts-list.
| D1 = DI-Z 8V2/0.5W-J-SMD (Z-Diode) | R1 = WID-S 10k -J-200-C0805 |
| D2 = DI-BR SMD (Brückengleichrichter 1A) | R2,R9 = WID-S 180k -F-100-C1206 |
| D4,D5,D6,D7 = DI-SI MM4148-M0204 | R3 = WID-S 270k -J-200-C0805 |
| T1 = TRANSISTOR BCX70 (NPN-Universal) | R4,R6 = WID-S 100k -J-200-C0805 |
| T2,T3,T4 = TRANSISTOR FMMT491A | R5 = WID-S 820R -J-200-C0805 |
| T5 = TRANSISTOR BCV47 (NPN-Darlington) | R7 = WID-S 3k3 -J-200-C0805 |
| IC1 = IC-SPEZ MC145027SMD | C1,C2 = KO-KEX 4n7 -K- 50-C0805 |
| IC2 = IC-CMOS 4051BD | C3,C4 = KO-T 1uF -K- 20-C0304 (Elko) |
| R8 = WID-S 4R7 .... 10R -J-200-C0805 |
This partlist is only valid for a specific configuration of the circuit and printed circuit board. When you limit yourself to the control of only two switch-coils and you do not plan to use the control of the illumination, than you don't need T4, T5, D4, D7, C3 and R9. When you want to control two switches and do not plan to use the illumination, than you can solder a FMMT491A as T5 in place, D4, C3 and R9 can be left off and you can use a 1N4148 as D3 (same as D4 - D7). You can connect the basis of T5 from R9 to the desired output of the 4051 by means of a small wire.
 I won't be able to help you with soldering of SMD components; is is described in MIBA 4/99, too.You will however need
a stable hand, sharp eyes or a magnifying glass, as well as a soldering iron
with fine point. Because removing SMD-components often leads to destruction,
not only of the component in (wrong) place but also of the complete printed circuit, you must be absolutly certain that the component is in the right place and in the right direction befor applying the soldering iron.
I won't be able to help you with soldering of SMD components; is is described in MIBA 4/99, too.You will however need
a stable hand, sharp eyes or a magnifying glass, as well as a soldering iron
with fine point. Because removing SMD-components often leads to destruction,
not only of the component in (wrong) place but also of the complete printed circuit, you must be absolutly certain that the component is in the right place and in the right direction befor applying the soldering iron. Below you will find the placement of the parts, from which you can also read the connections and the address pads. The numbers of the parts are corresponding to the numbers in the part´s list and the cirucit:
The setting of the decoders' address is done by means of soldering instead of the
usual switches. This is neccesary becuase of the limited space.
This means that all 5 adddres selection inputs of the MC145027 (P12, P14, P16, P18, P20) can be connected to ground (P11, P15, P19) or Vcc (P13, P17, P21), or can be left open. Pay attention that you DO NOT connect an address selection input with ground and Vcc at the same time. This will lead to a short circuit and will destroy the decoder.
When you are operating the decoder in a normal (Märklin or Märklin-like) way you must connect A5 (P20) to ground. The function of the connections is the same as with the 8-position DIP switch
at the C80 engine decoder; P12 at ground is S1, P12 at Vcc is S2, P14 at ground
is S3, P14 at Vcc is S4 etc. The setting of the address as described in the table is thus done the same way as
is described in the manuals of the Digital- and Delta-engines, with as addition
address 0 with all inputs open. You can find a table with setting of the inputs for the decoder address in
Elektor German-issue 7/78 page 21. This
table also shows the relation between the decoder address and the Märklin-
Keyboards. In edition 4/89 you can find a similar tabel as in the Märklin-
manuals for 81 addresses.
At Carsten Meyer you can find
an explanation.And finally you can calculate the adress with the formlua
dekoderadress = key-no. + (16 * (keyboardno. -1)).
For example: If you want to adress the 8. key aof the 4. keyboard the formula looks like:
dekoderadress = 8 + (16 * (4 - 1) = 56. When using the IntelliBox you must add "3" to the adress, because we can use the main-adress 0 wiht our decoder, which is used by Märklin and Uhlenbrock only in the idle-mode. This means that the IB-adress 56 must be adjusted at the decoder as adress 59 according to our adress-table. Vice versa you can switch a turnout with the adress 59 according our table when adjusting the IB to it´s adress 56.
When you are not using a Märklin or Märklin-like
Controller but another type of controller, like a self-
built Controller or a Software-Controller - then
you can control more than 256 switches or 512 magnetic devices.
Because you can address 81 decoder-addresses with four ternary 'trits', and because
every decoder has 8 sub-addresses (switching outputs) you can control 324 switches
or 648 magnetic devices. This would do for a larger layout. To whom this is
not enough, one can also connect A5 of the MC145027 to plus in stead of ground,
which gives addressing possibilities for another 324 switches.
In this case the Controller must be able to send the switch-commands with bit 5
set to high. This is the same way the functions-decoder in eg. the 'dancing
car' functions. You should connect A5 (P20) to Vcc in this case.
The sub addresses of the switch-coils are set by means of small, insulated wires. For this the base of the driver-transistors T2 and T3 (P30 and P31) resp. T2 - T5 (P30 - P32 as well as the pad from R9 which is pointing towards the base of T5) are connecting to the outputs X0 - X7 of the 4051 (P22 - P28 as with the pad of the anode of D4), corresponding to the sub- addresses 1-8.
The printed circuit board, that you can obtain in etched or in layout form for self-production from Mario Binder, has the same dimensions as the Märklin-decoder. It will fit in the switch at the pin that was intended for the original decoder. It might be neccesary to enlarge the hole in the pcb a little. You can use the original cable, cut to length, that is connected to the coils for the connection to the decoder. The same goes for the illumination. The joined connection from the coils (yellow) as well as one connection from the light (when you are going to use this option ), is soldered to P7 resp. P5. The controlling connections for the coils are soldered to P6, P8, P9 or - when the illuminationg is not used - P10. In the other case P10 is soldered to the illumination.
This functioning is based on a simple principle. When operated in the
standard way, after setting the switch, the Control Unit sends the 'off' command
to the decoder, which usualy is a "0".
When the illumination of the switches is activated then the Control Unit should send after switching the turnout with the main-adress of the switched turnout "255". This means that the 8th output (X7 on the 4051) becomes active. Because the 8051 is a 8-to-1 decoder this also means that all other outputs will be deactivated, which means that the just-set-switch will be deconnected from the current - which is the ame reaction as to the 'off'-command. This also means that when you switch any of the other switches with the same
main-address (0-80) that the 8th output of the decoder is deactivated for the
duration of the switch-command (ca. 0.25 sec). This would lead to an unwanted
flickering of all lights connected to this decoder.
For this situation the capacitor C3 is added. Together with the high amplification
of the Dalington transistor T5 this will take care of an additional time of
several 100 ms before the lights are deactivated.
This is complemented with a command from the controling unit. It will send a
command "255" with sub-address 8 for each switch-decoder to switch the lights on. For switching the lights off the command "0" is sent to each decoder. You can turn the lights on and off with a simple button.
This feature clearly leads to the fact that you cannot use one of the sub-addresses per main-address. It can not be used for switching anymore. This would however not lead to any limitations because when you use all main-addresses you can switch up to 648 magnetic components. The lost of 81 sub-addresses is not really relevant.
A similar addition to the M-track decoder will be presented next.
In the previous section the term control unit is used often. At the present
only LOK gives the possibility of controlling the
switches in the way described above.
It should however not be too difficult to use eg. the Märklin-Controller,
controlled by the interface and a pc, to generate the right commands. Who wants to use the option should use LOK or should address to his Hard-/Software-supplier for the needed additions / changes when it is not possible to do the changes themselves by eg. macro-programming.
![]()
This translation was made by Ronald Helder from Netherlands. Many thanks to him for this grateful work. Some mistakes you probably find are my work as result of trying to correct some misunderstandings.
![]()
